Overview
 Our blog highlighting RISC Inc’s VTA Learner Supervisor Utilities sparked several questions about the new VTA Learner Instructor functions. Within VTA Learner Instructors can schedule a training without VTA Administrator access. Another topic that piqued interest was the number of ways an instructor can add students to a roster.
• Scanning a QR Code
• Using the VTA Instructor Mobile App
• Swiping your existing company proximity badge or RFID
• Typing in a student’s name or ID
• Scanning a Bar Code.
Let’s explore each of these methods; how they save time, empower Instructors, and help reduce error.
Navigating Instructor Functions
Use the menu in VTA Learner to select Instructor. Remember that your menu options and order may be different from mine. The Instructor page has two tabs, one for history and one for schedule. The schedule displays a list of sessions that have not been moved to history where I am the instructor. If you see that the end date of a class has passed, it should be moved to history as quickly as possible, so the completion of training shows on a student’s transcript and/ satisfy a requirement. Even if the class date has passed the instructor can update the roster before they move the session into History.
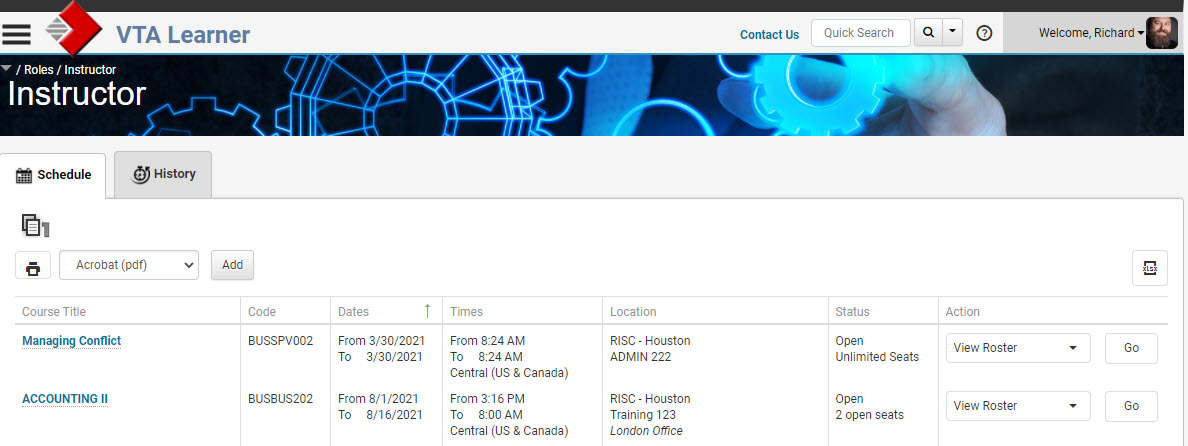 The history tab displays classes that I taught in the past. There is a filter at the top of the screen so you can change the date-range being displayed. While an Instructor cannot add or remove students to a roster in history. I can however and email the class.
 Adding Sessions from Learner
Lets go back to schedule so we can add a session and then enroll students, because that’s really where the fun stuff happens. To add a brand-new session, I can click the Add button at the top of the page. The pop-up window allows me to select a Course. The list is limited to scheduling courses where I am already setup as a qualified instructor inside the Back Office course catalog. I select the course I want to schedule from the list. Next, you can define the classroom, set the date and times for the class as well as the class minimum and maximum. This information will be used to populate the calendar notice for attendees and us used for conflict checking.
Adding Students via Learner
At this point, we have a new session with an empty roster. Students could register for the class through Learner. As an instructor, I have options of changing the status of the course and move the session to history. But before we move the session to history, let’s add some students.
Manually Adding
If I select “View Roster” we are going to see the empty roster for our new session. At the top the top of the click the Plus button to open a window allowing you to select a student to enroll. You can find the student by either name or ID number. When I close the “Add” window and go back to the grid, I can see the attendees, their enrollment status and, if there are any student documents made visible for instructors, they will display in the drop-down selector at the right of the screen.
Barcode – Scanning for Attendance
Now, the other way of getting data inside this inside this grid would be to scan attendees. But scanning can be done in a number of different ways that each fit different business needs. I can scan a barcode on paper. That bar code is associated with the student and they are added to the roster. Barcodes are a little older technology and do not work as well as QR codes if you need to scan them off a computer or phone screen. There are wireless bar code scanners but inexpensive scanners that plug into a USB drive work just fine. There is still validation of the data. Once a student’s bar code is scanned, the application will display a message if they are not on the roster. The instructor can choose to add them to the roster at that time.
Proximity Badges – Scanning for Attendance
The second method that I want to show here is using proximity cards. Companies regularly use these RFID badges for access control at doors, turnstiles, and elevators. If that is the case, there is no need to create a new badge. The “account” or ID associated with the badge, just needs to be mapped to a VTA ID. Once that is done, just like the barcode above, I can scan a badge and it will add the student record to the roster. The proximity card scanner I use also plugs into a USB input. Again, you can buy wireless and more advanced readers but for an investment of $10.99 with free shipping, the wired USB model is all I need.
In 2020 RISC assisted a client with a slightly more complicated integration between their facility and an off-site training center they regularly used. In this case, is an added mapping of the training center’s course code and VTA Course code. Fortunately, the two groups were both using the same employee ID or it would have required mapping as well. Now, when someone scans their company badge at the 3rd party training center, the attendance record is sent back to VTA in addition to the training center’s learning management system.
Mobile Scanning for Attendance
This time we are going to add students to the roster but I can actually close out of VTA Learner all together. We are going to scan a student’s QR code to add them to a roster using the VTA Mobile Apps – specifically the:
• VTA Student App
• VTA Instructor App.
Yes, there are handheld scanners that can read a QR-code but mobile phone cameras really work great. This is the VTA Instructor app loaded on my iPhone after downloading from the App Store. There is also an Android version available for download in the Google Play Store. In the instructor app, I have the ability to scan as a student and either add them to the roster or mark them present for the class. There are several videos and blog articles covering the RISC VTA Mobile Apps. I will leave you to those I will put links at the bottom of this blog.
The final element of the Instructor app is going back to move sessions to history and update scores as needed. While moving a session to from schedule to history using the VTA Instructor App, you can add students and update scores.
More information?
Do you have questions about the RISC VTA Suite? RISC’s ADL Conformant learning records store? xAPI and cmiv5 consulting and support? Reach out to RISC at 281-480-7910 or email duncanw@risc-inc.com
Click here to learn more about the VTA Instructor App, the VTA Student App and the VTA Supervisor App.
Mr. Welder’s career is founded in traditional instructional design and computer-based training development. He is a certified Development Dimensions International facilitator, a Kirkpatrick Certified Evaluator and facilitator of the Ohio State University curriculum development program. In addition to working in industry, Mr. Welder has held adjunct faculty positions at Bowling Green State University, Ohio and the College of the Mainland, Texas. Mr. Welder has been published in both Training Magazine as well as US Business Review.