Introduction
You can have students launch individual training completion certificates online in VTA Learner using an HTML template that is set as the final, optional (non-required) Document Lesson of the Course.
This can be done as follows:
- Add the certificate Learner Application
- Develop the certificate template
- Add the certificate Lesson
Add the ‘Certificate’ Learner Application to your Site (One-time setup)
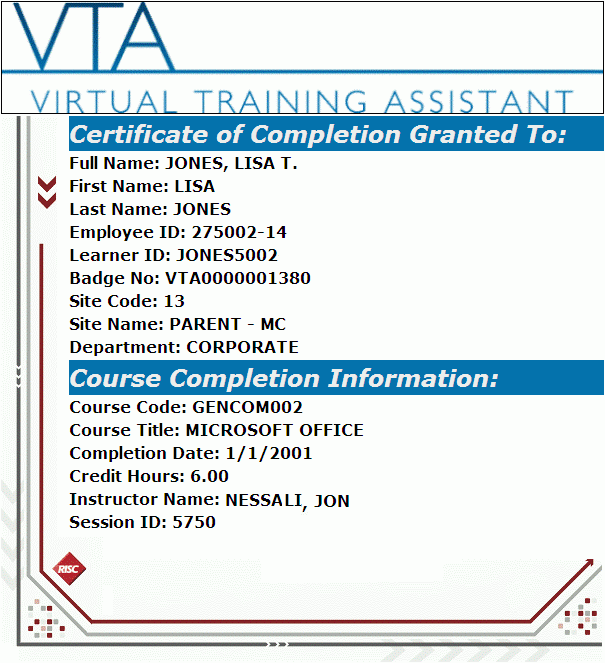
RISC, Inc. has developed an application that will pull the following fields for display on certificates:
- Trainee Full Name
- Trainee First Name
- Trainee Last Name
- Trainee Employee ID
- Trainee Learner ID
- Trainee Badge Number
- Trainee Site Code
- Trainee Site Name
- Trainee Department
- Course Code
- Course Title
- Completion Date
- Credit Hours (
 in 2012 for VTA 6.2 only!)
 - Instructor Name (or “Online” if a self-study course)
- Session ID
In order to use the application, each VTA Site must have it added to the Learner Applications grid.
Instructions:
- In VTA Administrator, open the Catalog Menu Group and open the Learner Applications grid
- Click Add
- Set the File Extension to “CRT”
- Set the Short Description to “Online Certificate”
- Click OK to save and close the record
Develop the Online Certificate in HTML Format
You can download a sample certificate template using the link below and make design modifications as needed. Be sure NOT to delete the variables within the JavaScript as these will be used to display information passed from VTA Learner to the certificate.
Click here for the Certificate Sample zip file
NOTE: This template should NEVER be modified using a Microsoft Office application like Word or PowerPoint.
You can use one template file for all courses or you can customize the standard certificate for a specific course or training initiative. Be sure the file name in the Command Link (“yourcertificatefilename.htm”) refers to the correct template.
Store Certificate Template on a Web Server
SaaS Clients: If you do not have a RISC Content Server Hosting agreement, contact RISC, Inc. to have your template posted at no cost.
Set Certificate Template as the Final, Non-Required Document Lesson on Course
When the document is launched from VTA Learner, the certificate will display the selected fields on the template in a printable format.
An online certificate must be setup as the final Lesson of a course.
A certificate Lesson must be set as a NON-required Lesson so trainees are given full credit for the Course regardless of them printing the certificate or not.
Instructions:
- In VTA Administrator, open the Course record and navigate to the Lessons tab
- Click Add
- Uncheck the Required checkbox (This is mandatory for certificates to work. If left ‘Required’, the student will not be done with the Course and no Completion Date can appear on the certificate.)
- Enter a Lesson Name
- Set Lesson Type to ‘Document’
- Set the Command Link as follows:
[YourWebServerFolderPathToYourCertificate]/[yourcertificatefilename.htm]?&EmployeeName={EMPLOYEENAME}&FirstName={FIRSTNAME}&LastName={LASTNAME}&EmpID={EMPID}&LearnerID={LEARNERID}&Badge_No={BADGE_NO}&SiteName={SITENAME}&SiteCode={SITECODE}&Department={DEPARTMENT}&CreditHrs={CREDITHRS}&CourseTitle={COURSETITLE}&CourseCode={COURSECODE}&Sess_Key={SESS_KEY}&InstName={INSTNAME}&CompDate={COMPDATE}
7. Set Application to “CRT – Online Certificate”
8. Completion Action
- Set as ‘No Action’ if you do not care to retain the date the student printed the certificate
- Set to ‘Credit’ to retain the date the student printed the certificate
9. Click OK to save and close the record
NOTES:
- The “[YourWebServerFolderPathToYourCertificate]” in the Command Link will be the web server folder that contains your certificate template(s).
- The “[yourcertificatefilename.htm]” in the Command Link will be the name of your certificate template file.
- All selected parameters to be displayed on the certificate are to be included in the Command Link after the question mark. If you modify the certificate template to control which fields to actually display, the Command Link must “match”. This means that if it a field is not displayed in your certificate template, it must not be used within the Command Link.
For example, if you modified the template to only show the student’s Full Name, Course Title and Completion Date, it would look like this:
[YourWebServerFolderPathToYourCertificate]/[yourcertificatefilename.htm]?&EmployeeName={EMPLOYEENAME}&CourseTitle={COURSETITLE}&CompDate={COMPDATE}
Example
Below is an example of all available fields displayed on an online certificate for a classroom event: