Competency Assessment in VTA
This is the second article in a 2 part series on the Competency Assessment features of v7.0. In this article we cover the creation of development plans by assessors. (Go To Part 1)
The Development Plan
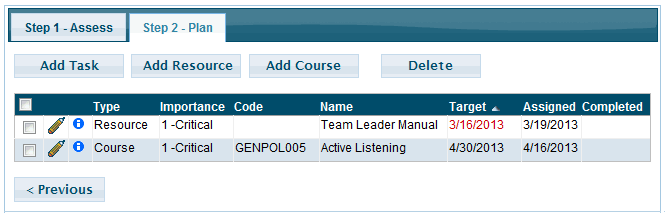
The Development Plan is an action plan for a student to improve their proficiency in assigned competencies. Three types of items may be assigned on a development plan.
- Tasks Tasks are activities to be performed by a certain target date.
- Resources Resources are sources of information that can be assigned by an Assessor to a student. Examples of common resources include books, mentors, subject matter experts and web sites.
- Courses Courses may include both self-study and instructor-led classes for the student to complete
Items on the Development Plan are assigned by the assessor.
Accessing the Development Plan
To assign items to the development plan, you must first be performing an assessment (see part 1).
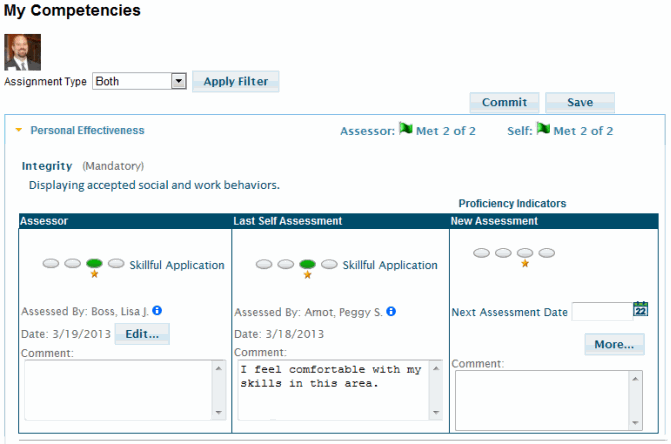
- If you performed the previous assessment, you may click the “Edit…” button in the Assessor box. This will allow you to edit the previous assessment and its associated development plan.
- If you are performing a new assessment you can click the “More…” button in the New Assessment box.
In either case, you will be taken to the Competency Assessment Details page.
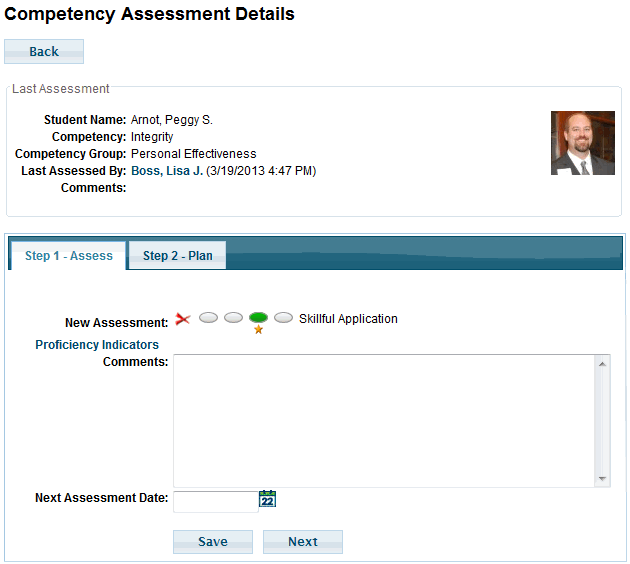
On this page you may select a proficiency level, enter comments and choose a Next Assessment Date. Then click either the “Next” button or “Page 2 – Plan” to go to the Development Plan. On this tab you can assign items for the student to complete in order to improve their Proficiency Level for a given Competency.
Tasks
To add a new task click the Add Task button. Here you can enter details about the task you wish the student to perform.
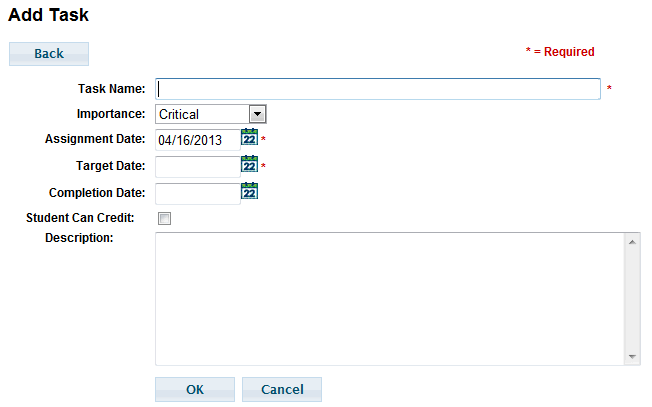
ill in the name of the task.
- Select an Importance Level for the task.
- Select a target date for the completion of the task by the student.
- Once the student has completed the task, you can fill in the Completion Date. If the task is not yet complete, just leave the Completion Date blank.
- If the student can record completion of the task, check the “Student Can Credit” box.
- Optionally, you can provide a description of the task.
- Click the OK button to save the new task.
Resources
You can add a Resource by clicking the Add Resource button. There are two ways to select resources to assign to students.
- Resource Search
Click the Select Resource… button to display the Resource Search page. This is the easiest way to locate a resource. It will display a list of resources that have been associated with the competency you are assessing. - Use Autocomplete
First select a Resource Category, Resource Type and Resource Site. Then, in the Resource Name field, begin typing the name of the resource you wish to assign. The Resource Name field is an “autocomplete”, displaying a list of values that meet the characters entered by the user. Type at least three characters of the resource name to get a list of resources that match your entry.

After you have selected your resource using one of the methods above, you may enter the remaining data about your resource assignment.
- You may enter a title for the resource. This will display instead of the Resource Name in the student’s development plan. If you leave the Title blank, the resource name will display in the development plan.
- Select an Importance Level for the assigned resource.
- Select a target date for the completion of the resource by the student.
- Once the student has completed the required interaction with the resource, you can fill in the Completion Date. If the resource is not yet complete, just leave the Completion Date blank.
- If the student can record completion of the resource, check the “Student Can Credit” box.
- Optionally, you can provide a description of the resource.
- Click the OK button to save the new resource
Courses
You can add a course for the student to complete by clicking the Add Course button. There are three ways to select courses to assign to students.
- Course Search
Click the Select Course… button to view the Course Search window. This is the easiest way to locate a course. The Search By Competency page will display courses that have been associated with the competency you are assessing. - Use Course Code Autocomplete
The Course Code field is an “autocomplete” field. Select the course site and then enter at least the first three characters of the course code to display the autocomplete list. - Use Course Title Autocomplete
The Course Title field is an “autocomplete” field. Select the course site and then enter at least the first four characters of the course title to display the autocomplete list.
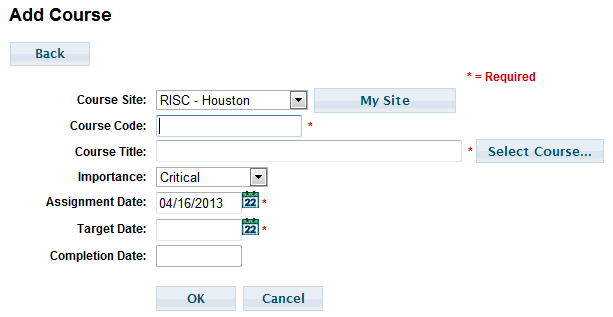
- Select an Importance Level for the assigned course.
- Select a target date for the completion of the course by the student.
- Once the student has completed the required course the Completion Date will fill-in automatically.
Note: The student will not get credit for completion of the assigned course unless they complete it AFTER the Assignment Date. If they have completed the course in the past, and you assign the course again, then they must take it again to get credit for the development plan item.
Saving vs. Committing
As we discussed in part 1 of this series, there are two ways of saving assessment data. The Save button saves your development plan data with a “Pending” status. This means that you may come back at some future time and change the data as needed. Pending data is not shown to anyone but you. When you are ready to have your assessment and the associated development plan items show to the student, you must “Commit” the data on the “My Competencies” page (or the “Student Assessment” page if you are a named assessor.