Schedule Reports in VTA Backoffice v7.0
In v6.2 of VTA we introduced the popular Report Favorites feature. In 7.0 we are (at last) releasing the Report Scheduler feature that users have requested since 6.2. This is part 1 of a 2-part article.
Report Favorites
To schedule a report, you must first create a Favorite for the report you want to schedule. For more information on creating report favorites, please see the blog article Report Favorites. Be sure to give your report favorite a descriptive name and include a detailed description of the purpose of the report and summary of the selected criteria. As you create & schedule more and more favorites, this information will be invaluable in helping you tell your reports apart.
Scheduling A Favorite
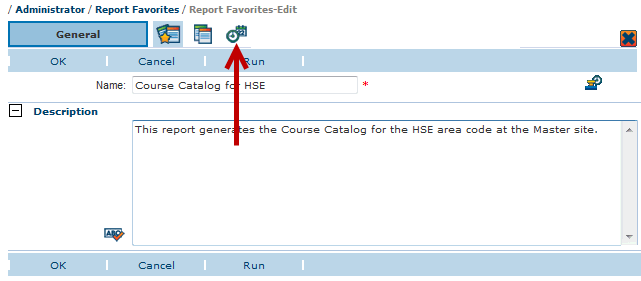
To schedule a report, edit the desired report favorite, access the Scheduler tab and set the schedule settings.
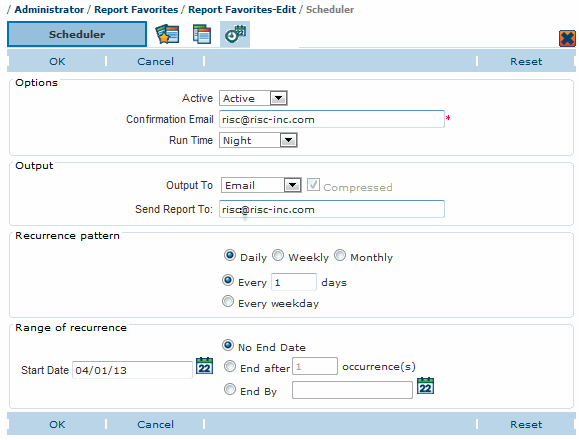
You will then see the Scheduler Options page. Each section on this screen is discussed below.
Options
- Active If Active, the report will be run by the Scheduler. If inactive, the report will not be run by the Scheduler.
- Confirmation Email This is the email address that will receive a confirmation email indicating whether the report ran sucessfully or failed.
- Run Time This is the time of day when the report should be run. Values are Night, Morning, Afternoon & Evening. These times are based on your time zone (if set in your profile) or your site’s time zone. “Night” is “Midnight” to 6AM, “Morning” is 6AM to noon, “Afternoon” is noon to 6PM and “Evening” is 6PM to Midnight.
Output
The Output section is used to set the output method for the scheduled report. The selected Output To value determines the fields that will be displayed in this section.
Output To: Email
Choosing “Email” for the “Output To” option will cause the report to be delivered as an email attachment to the specified email address. When the email is sent, the email subject will contain the Report Favorite name. The report is attached as a password protected zip file, where the password for the zip file is the VTA Administrator ID that scheduled the report.
Note 1: You are only permitted to send the email to one recipient. If you need to send this report to multiple recipients, you can setup a rule in your email application based upon the email sender and subject (Report Favorite Name) that will automatically forward the report to the appropriate recipients for you automatically.
Note 2: Your company may limit the size of email attachments that you receive. Although the report is compressed in a zip file, you should check with your IT group to determine the maximum file size you can receive. If the report is too large to send, the report will be posted to Backoffice and will be available for download, as long as RISC knows the maximum size of file you can receive.
Output To: Backoffice
Choosing “Backoffice” for the “Output To” option will cause the report to be posted in the “Scheduled Reports” area of the Home page in Backoffice where they can be downloaded. Each VTA Administrator will only see the reports on the Home page that he/she scheduled; they will not be able to view reports generated by others. Each report posted to Backoffice will show the Report Favorite Name, Completion Date and Expiration. Simply click on the Favorite Name to download the report.
Output To: FTP
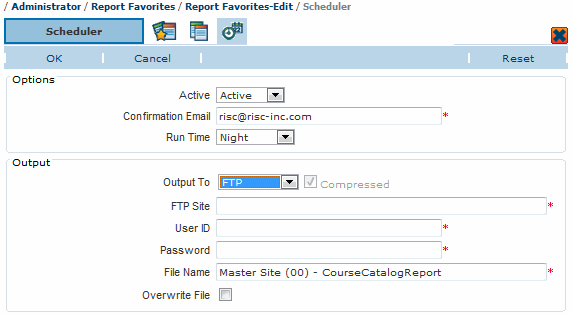
Choosing “FTP” for the “Output To” option will cause the report to be posted to an FTP site. NOTE: This option would be useful for providing VTA data for interfaces with other applications. Since FTP sites are not secure sites, the report files posted here will be zipped and password protected just like reports sent through email. RISC does not recommend using an FTP site to post reports that contain any sensitive data.
When choosing this option you must supply:
- An FTP Site where the report file will be posted.
- The User ID and Password must be supplied so that VTA can logon to the FTP site and post the report.
- The File Name to use when creating the report on the FTP site.
- If Overwrite File is checked and the file already exists on the FTP site, it will be replaced with the new report each time the report is run. If Overwrite File is not checked then the date and time of the report generation will be automatically appended to the report file name.
Output To: SFTP
Choosing “SFTP” for the “Output To” option will cause the report to be posted to an SFTP site.
- If the Compressed box is checked, the file will be zipped and password protected just like reports sent through email. If this box is not checked the report will not be zipped and password protected.
- An FTP Site where the report file will be posted.
- The User ID and Password must be supplied so that VTA can logon to the FTP site and post the report.
- The File Name to use when creating the report on the FTP site.
- If Overwrite File is checked and the file already exists on the SFTP site, it will be replaced with the new report each time the report is run. If Overwrite File is not checked and the file exists, the date and time of the report generation will be automatically appended to the report file.
Output To: UNC Path
This option is available ONLY to non-hosted customers. Choosing “UNC Path” for the “Output To” option will cause the report to be posted to an internal file server.
- If the Compressed box is checked, the file will be zipped and password protected just like reports sent through email. If this box is not checked the report will not be zipped and password protected.
- The UNC path where the report file will be posted.
- The File Name to use when creating the report.
- If Overwrite File is checked and the file already exists, it will be replaced with the new report each time the report is run. If Overwrite File is not checked and the file exists, the date and time of the report generation will be automatically appended to the report file.
In Part 2 of this article, we will discuss the Recurrence options for generating Scheduled Reports.


